OMG. This guy is incredible. Check out some of his other videos.
https://www.youtube.com/watch?v=x7onZGqrYyY
Monday, October 5, 2015
Tuesday, April 28, 2015
Shop vac follow up.
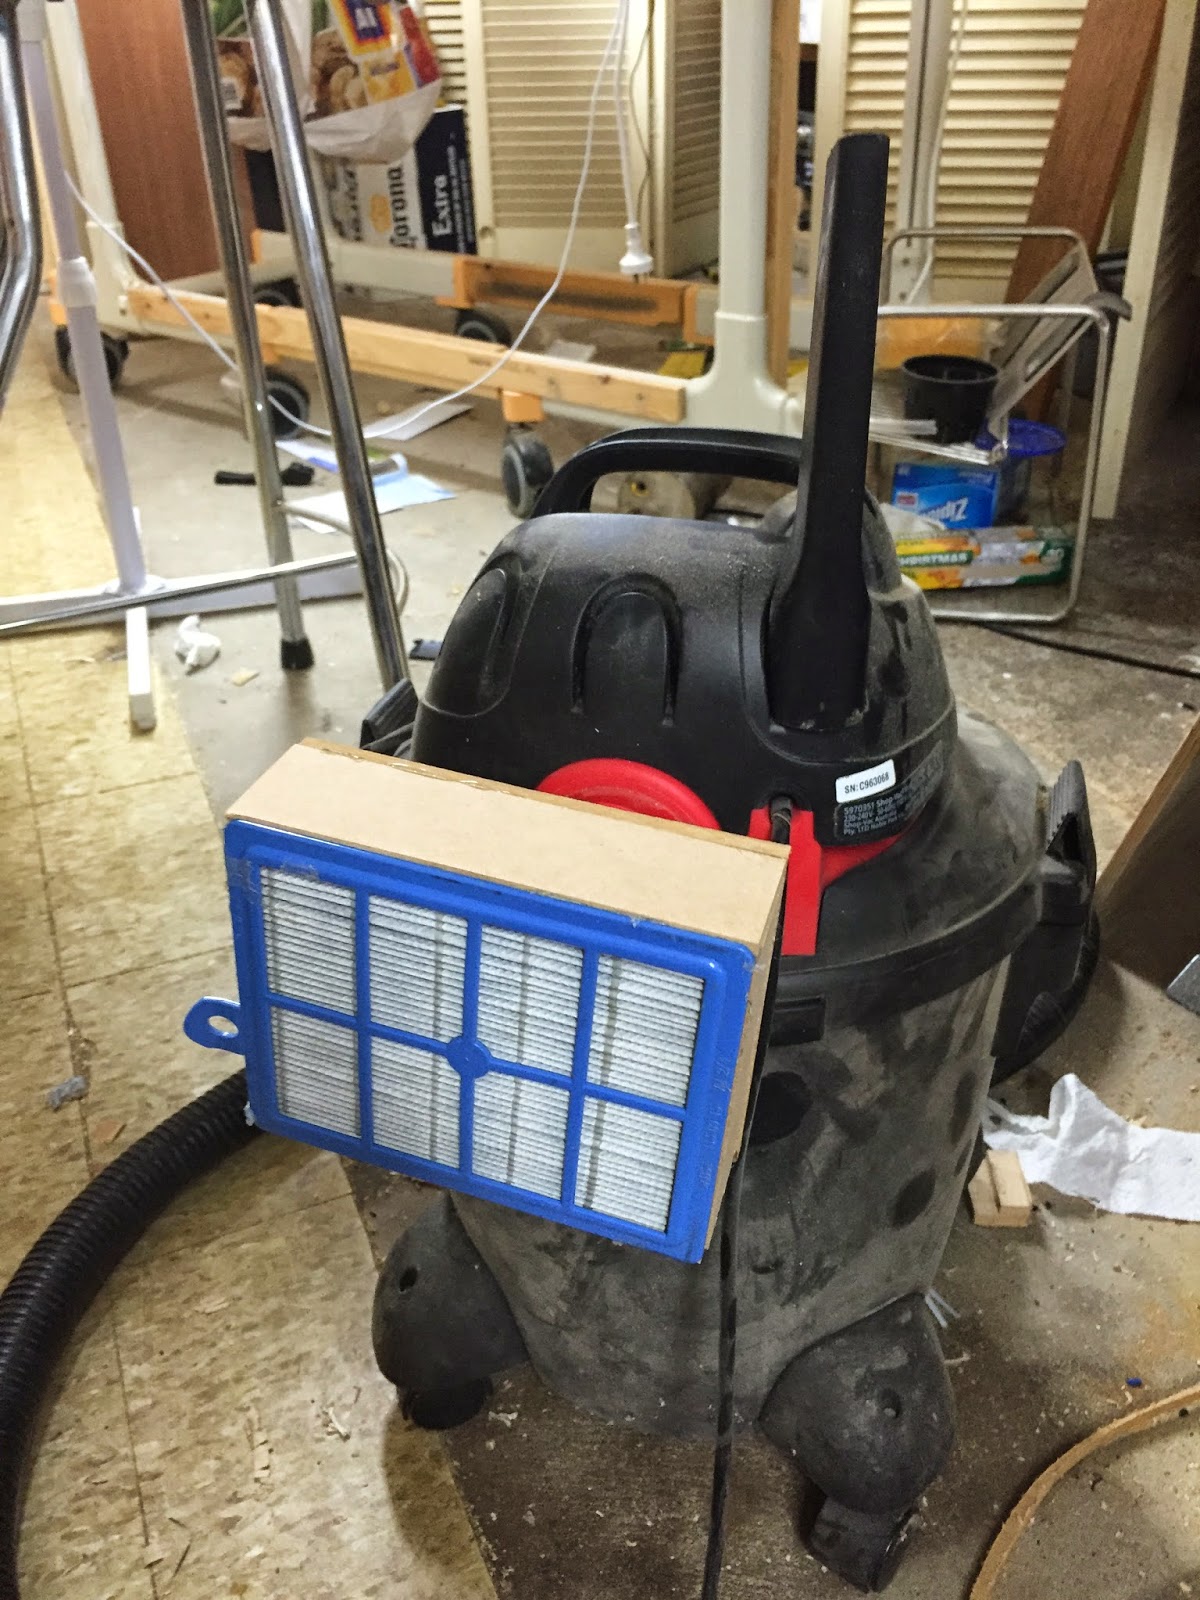
Its been a number of months since putting the new and improved shop vac into service. So this is a quick follow up as to how its going.

And this is the filter from the shop vac. Just a light coating of dust. Considering i could only get about 10l of waste before having to clean this filter due to lack of suction, the addition of a cyclone was a very worthy addition.
The is in the order of 60l - 70l of waste in there, ranging from nuts and bolts to superfine dust.
Al
Finishes Cabinet
My finishes are nicely organised, but just not in the same location. Time to organise!


I also cut a rabbit into the front and back panels  Glueing and nailing the shelves in place.
 As the table saw is on wheels i thought it would be easiest to drag it outside and use the to line up the cut. Little precarious but went ok.

I thought i'd make it like a box, then cut it in half to make the two sides. Much easier then trying to make two identical halves.
I usually use the table saw to cut dado's but i thought i'd mix it up and busted out the router with a 12mm straight cut bit. (the same thickness as the plywood used.) These were for the shelves.
Finial cut. and now it should be in two. Nope. The thing about using this technique to make a box is you can't have shelves in it, unless you have a blade that can reach over half way of the box. Which i do not. So quick trip down to the hardware saw to pick up the biggest handsaw they have.
And this why i don't use handsaws. Can't cut straight to save my life. So had big chunks missing from some of the shelves. No problem cut some scrapes to fit and glued and clamped them in place. Good excuse to try out the edge banding clamps.
Fished the whole thing in 2 coats of wipe on poly and added wheels to each half.
All and all, much learnt and much gained.
Al.
Saturday, March 28, 2015
10 Min Hack #9
Its 1300 on a Sunday afternoon and your after a 0 ring to suit a Victa 2 stroke lawn mower.
You've got to be kidding right?
Your serious.
Christ.
So walking around the hardware store looking (and not finding) a oring with a ID of 28mm i came across giant orings to suit a toilet.
Hmmmm
I wonder.
 Thinking about the different ways i could cut this, knife, scissors, drill, teeth.
Cutting it may work, but i'm crap at cutting circles with any accuracy. So i went with plan b.
 I sandwiched it between 2 bit plywood after lining up the center of the oring with the middle hole.
 Drilled out the center with a fornster bit, then the outside with a hole saw.
 Winning.
Back to mowing the lawns.
Till next time.
Al.
You've got to be kidding right?
Your serious.
Christ.
So walking around the hardware store looking (and not finding) a oring with a ID of 28mm i came across giant orings to suit a toilet.
Hmmmm
I wonder.
Cutting it may work, but i'm crap at cutting circles with any accuracy. So i went with plan b.
Back to mowing the lawns.
Till next time.
Al.
Wednesday, March 11, 2015
Sanding Cart
I've had a belt / disc sander for a couple of years and it's been placed on random flat surfaces around my shed. A couple of months ago i bought a oscillating spindle sander and that triggered this build. Can't have two homeless machines! As per the other carts I've made, this one is constructed with pine and plywood. Nothing special to mention about the build, butt joints for the pine and pocket holes for the plywood.
 The finished cart.
Notable features include.
- 10W LED floodlight on a movable arm (re-purposed from an old ventilator)
- Intergrated dust extraction. I just need to connect one 10mm hose to the side of the cart to get dust extraction for all machines.
- LED strip lightening for the interior of the cart.
- Velcro on the side for spare sanding discs to stick to.
- Integrated power-board, only need to connect one plug to power to get power to all machines and lights.

I carefully considered the placement of the machines to allow for as small top as possible. Which for the most part worked, until i tried to change the sanding belt and found this task was impossible as some genius had put a spindle sander in the damn way! So back to the drawing board for a solution.
 Which ended up mounting the spindle sander to a board adding some hinges and a piece of scrap steel to support it when its in the up position. This machine only weights 13kg and in the up position its right on its balance point negating the need for any additional support. The other machine weighs about 30kg, hence why I choose the spindle sander to tilt.
 There is normally a cover over this area. Starting on the left is 2.5" dust port for the disc sander, 4 port power board, LED power supply, another 2 x 2.5" dust ports and finally on the right a 100mm dust port.
Aside from the hiccup with machine placement, this project went well and is very functional. And like everything else in my shed it's on wheels. I'll probably add shelves and doors to the bottom at some stage, once i worked out what to put in there.
Till next time.
Al
Notable features include.
- 10W LED floodlight on a movable arm (re-purposed from an old ventilator)
- Intergrated dust extraction. I just need to connect one 10mm hose to the side of the cart to get dust extraction for all machines.
- LED strip lightening for the interior of the cart.
- Velcro on the side for spare sanding discs to stick to.
- Integrated power-board, only need to connect one plug to power to get power to all machines and lights.
I carefully considered the placement of the machines to allow for as small top as possible. Which for the most part worked, until i tried to change the sanding belt and found this task was impossible as some genius had put a spindle sander in the damn way! So back to the drawing board for a solution.
Aside from the hiccup with machine placement, this project went well and is very functional. And like everything else in my shed it's on wheels. I'll probably add shelves and doors to the bottom at some stage, once i worked out what to put in there.
Till next time.
Al
Tuesday, March 10, 2015
Shop VAC mk III
So this shop vac has gone through a number of changes over it's life and i think this may it's last (who am i kidding as if this is going to be the last) I'm up to round three in collection containers post cyclone. The reason? Too much suction! It keeps crushing the plastic buckets / bins I've tried. So a permanent solution was in order. In the form of a really thick cardboard tube. The other thing that needed to be addressed was its size, it needed to have a smaller footprint.
 So construction commenced. The running design was vertical in nature, so i added bricks to the base to promote stability. (I later regretted this when the entire weight of the setup landed on my foot!) All the materials used for this build are reclaimed / re-purposed with the exception of the four main posts.
 The base complete. I intentionally left the pallet markings on the wood as i think its looks kinda cool. You don't? I don't care, it's happening.
 Cutting the cyclone intake from the lid. It amazes me how much can be done with a 10 volt drill! Ideally this procedure should be done at the drill press but the lid wouldn't fit there. And i ignored my inner pat's demand to use a corded drill and used the cordless drill.
 To make it easier to service the shopvac filter i installed draw slides so now the vac slides out when i need it to.
 And the finished product! Finished with 2 coats of wipe on poly. The god awefull block next to the cyclone allows for the unit to be pulled by the vac hose without ripping the cyclone off the lid and thanks to the bricks doesn't tip over. All in all i think it was a win. Container no long collapses and takes up less floor space. Oh and the container is massive! Hopefully only requiring quarterly emptying.
Till next time.
Al.
Till next time.
Al.
Wednesday, February 11, 2015
Kitchen Cabinet
With the addition of so many new kitchen appliances the floor was no longer a nice place to store them, so a cabinet was commissioned.
Using 12mm "caravan ply" which appears to be form ply (hence the black back) with a stupidly thin hardwood veneer, a cabinet was made using dado joints and a ambitious mitered top. I'd never tried (with any success) a miter as long as this.
I found a pleasing filter for the camera and took some shots of the build.
 Cutting the dado's on the table saw.


Assembling the cabinet on the back of the ute.

And the finished product post 3 coats wipe on polyurethane finish.

And a mighty tight miter! Great result.
Till next time.
Al
Using 12mm "caravan ply" which appears to be form ply (hence the black back) with a stupidly thin hardwood veneer, a cabinet was made using dado joints and a ambitious mitered top. I'd never tried (with any success) a miter as long as this.
I found a pleasing filter for the camera and took some shots of the build.
And the finished product post 3 coats wipe on polyurethane finish.
Till next time.
Al
Tuesday, December 9, 2014
Shop Vac Upgrade
I love cyclonic vacuums. A lot. I've had Dyson cyclone for about 4 years now and recently i pulled the wash every 6 months HEPA filter out for the first time and it was perfectly clean. I was shocked, that's efficient cyclone! That vacuum has been used and abused over its life from sucking up superfine MDF and plaster dust to dirt, screws and leaves and it has not failed yet.
I've (and possibly my neighbours) of having to take the filter out of the shop vac every couple of empties to take it out into the yard and blowing it out with compressed air. Usually creating giant dust clouds.
So I decided to add a cyclone to my shop vac. The cheapest available solution that I could find was a Dust deputy which was $85 just for the cyclone, no bucket or hoses were included. The full kit was $179. Considering i only paid $30 for my shop vac that seemed a little pricey. The other day on eBay i noticed a Chinese clone of the dust deputy for $50. Still more then I wanted to pay, but I really wanted to stop having to clean that damn filter, so I bought it. I have made one before but it would be really fiddly to make one that small.
I started with making a little trolley to hold it all and used the wheels from the shop vac to make it mobile. Added a handle to make it easy to move around. The cyclone is bolted to a sheet of 12 mm ply and held down to a 30l bucket with bungee straps with some weather strip added between the ply and the bucket to achieve a good seal. Lastly the vac was screwed down to the base, I don't plan on having to empty the vac very often so I don't mind undoing a couple of screws to do that.
I tested it buy sucking up about 10l of stuff that I had emptied from the shop vac. Opened the shop vac and it was perfectly clean! Yay!
The Finished result.
 Till next time
Al
I've (and possibly my neighbours) of having to take the filter out of the shop vac every couple of empties to take it out into the yard and blowing it out with compressed air. Usually creating giant dust clouds.
So I decided to add a cyclone to my shop vac. The cheapest available solution that I could find was a Dust deputy which was $85 just for the cyclone, no bucket or hoses were included. The full kit was $179. Considering i only paid $30 for my shop vac that seemed a little pricey. The other day on eBay i noticed a Chinese clone of the dust deputy for $50. Still more then I wanted to pay, but I really wanted to stop having to clean that damn filter, so I bought it. I have made one before but it would be really fiddly to make one that small.
I started with making a little trolley to hold it all and used the wheels from the shop vac to make it mobile. Added a handle to make it easy to move around. The cyclone is bolted to a sheet of 12 mm ply and held down to a 30l bucket with bungee straps with some weather strip added between the ply and the bucket to achieve a good seal. Lastly the vac was screwed down to the base, I don't plan on having to empty the vac very often so I don't mind undoing a couple of screws to do that.
I tested it buy sucking up about 10l of stuff that I had emptied from the shop vac. Opened the shop vac and it was perfectly clean! Yay!
The Finished result.
Al
Monday, December 8, 2014
Pallet Pal
With the addition of a ute added to Al's shed fleet, i'm now able to transportate large stuff around, in particular pallets.
 Pallets are great. They're free and mostly made from hardwood. Pallets are designed to never come aapart toensure the longest lifespan. This is achieved by using spiral nails, sometimes glue coated.


These nails are designed by satan himself. They are very very difficult to remove with a hammer, you really need quite a lot of mechanical advantage to remove these. It also makes prying the boards off a pallet without damaging the pallet very changeling. There are various methods around the internet of breaking down pallets, but all seem to be more difficult than is necessary and either result in a low yield or cut off nails which are difficult to remove.
Luckily Izzy Swan over at think wood works has developed a cracker tool to solve this problem.
The pallet pal.
Check out it being built and in action here:
https://www.youtube.com/watch?v=Kpcur7RTDVU
So i decided to make one.
Because it straddles both side of the board being removed and having a long handle it really makes short work of breaking down pallets.
In the three pallets i've broken down i've only cracked one board.
If you have the urge to break down pallets i strongly suggest you to consider making one of these. Its quick to make and quite cheap even if you have to buy the plywood and threaded rod.
Till next time.
Al
Wednesday, December 3, 2014
Shop vac get a HEPA filter
The air filter on my $30 shop vac sucks, not in a good way. When i suck up super fine dust it can be seen coming out the exhaust port back into the air. Most unsatisfactory. I've been thinking about upgrading it to a HEPA filter for a while, but they are a little pricey. Recently i got a new dust extraction system which meant i decommissioned by DIY cyclone one i had made earlier. When i pulled apart one of the vacs that was in that system i discovered it had a HEPA filter.
HEPA (High-efficiency particulate air) filters remove at least 99.97% of airborne articles 0.3 micrometers (µm) in diameter or larger.


Next i made a quick box to encase the filter using 3mm MDF and hot glue and cut a hole on the back before i attached it. (Baking paper works great to stop hot from setting where it shouldn't)
 I had to be careful to not get glue on the pipe, as that hole would serve as the maintenance port for cleaning.
HEPA (High-efficiency particulate air) filters remove at least 99.97% of airborne articles 0.3 micrometers (µm) in diameter or larger.
I started with figuring out how to adapt the rectangle filter to the round exhaust port. I had a 2.5" to 4" adaptor that would be a good start but the exhaust port was only 2" in diameter. So I cut it in half and removed the excess material to form a 2" pipe and plastic welded it back together.
Wham bam thankyou mam, shop vac now has a HEPA filter.
Till next time.
Al
Sunday, November 30, 2014
Al gets a lathe!
The story starts as usual, me getting a deal. I was at a garage sale on the weekend and spotted a lathe. Mr man initially water $80, he had reduced it to $30 as it was getting late in the morning. I offered he $20 and a deal was done! When i was a kid i remember going to my grandparents house and being assisted by my grandfather, using the lathe. It was good times and not that difficult, well for basic stuff anyways. A lathe is something i've always been keen to have, every now and then a need for one arises (trivets for instance) but i've never been able to justify buying even a cheap lathe. Until now. It seems $20 is the buy in price for Al to buy a lathe.

A$20 lathe! It wasn't in bad condition little rusty, little been dropped from a bench, and average paint condition. As i had it outside i thought this would be the perfect opportunity to give it quick refresh.


So the following work was done.
So the following work was done.
- Full nut and bolt teardown
- Sand to bare metal and respray.
- Bearings were in perfect shape, no movement side to side and spun freely.
- Power switch also in very good shape, almost no wear to the contact pads.
- Low friction tape applied to metal on metal contact points.
- New power lead attached.
- No bolts were included to keep the side door closed, so a 6mm thread was tapped to allow for the star knobs on the side.
All in all i'm rather pleased with the outcome. It was great to get some more practice with the spray gun. Hopefully now with its mid life update it'll continue to function for years to come.
Till next time.
Al
OCD Screw Style!
As with so many of my projects this one starts by getting a deal! I am constantly on the lookout for high quality inexpensive cases to hold stuff. In this case i found some good cases almost half price from repco. One of these cases would be perfect for storing commonly used screws in the bottom of my tool chest. The case just fitted and i removed the lid by removing two rods from the back so that should i wish to take the screws on the road it would only take a minute to reattach the lid.

 The most common screws i find myself using are 8g screws, so they are easily at reach in the top sections. 6g Screws can be found by lifting out the MDF container as shown in the above pic. I made the MDF containers and dividers from 3mm MDF hot glued together. The project was finished off by a quick labeling session to quickly identify what was in each container.
Till next time
Al
Till next time
Al
Thursday, November 20, 2014
Trivets!
With christmas rapidly approaching, gifts need to be found or in this case made.
The basic idea behind the design was poached from some ones i found in a homewares store. Those ones were just pieces of dowel with holes drilled to hold the rope. I thought i could make a more interesting design and for much less then the $35 the store wanted for one.
And so the project begins!
 I really wanted to make my own dowel as i have some hardwood stair treads laying around that would have been perfect for this project, but alas operation "make a doweling jig" did not end up with a usable jig. So 25mm hardwood dowel was purchased and cut to 175mm lengths. Then planed round, the store bought dowel was mostly round, but not round enough for what i needed it for.

Next up was to drill some holes in each end. It dawned on me that even if i punched a mark on the timber prior to drilling the holes it would be almost impossible to get holes that perfectly matched up. So a jig was made!
I cut a hardwood block in half, drilled a 25mm hole in each end, then carefully marked and drilled a 4mm hole in the top of each one. And lastly cut a slice out on the bandsaw from each bottom so the final dimension of the 25mm would be slightly less when a clamp was applied holding the dowels tightly in place.
Once that was made i was able to drill the holes at the end of each dowel precisely.
 I wanted to cut two grooves at each end of the dowel. Usually this operation would be preformed using a lathe, which i dont have. So to the internet! Turns out other people have faced this problem and making a router jig was the easiest solution. So i knocked up this contraption. Dowel gets feed into the hole, the router is lowered till it reached its depth stop and the dowel rotated (hence the need for really round dowel. I found that if it wasn't really round it would bind and get stuck when i tried to turn it) then when all dowel was cut the jig was adjusted to cut the second groove.
 The end result.
I applied a coat of tung oil to one of the test pieces and was quite happy with the result, but i felt it needed something more but i wasn't sure what. So i took 24 hours to have a think.
The next day i was doing some plastic welding and it dawned on me, i needed to blacken the groves with the soldering iron. So with all the enthusiasm in the world i set to it! And stopped once my back started to get sore, which was only 10mins after i started and i had only done 4 grooves. A quick bit of math removed any bit of remaining enthusiasm . 4 groves per rod and a total of 14 rods = 56! This was going to take a while. Luckily Mrs Paleface was kind enough to lend a hand so it went a little quicker.

 And the finished product after a second coat of tung oil.
Its design allows for it to either be compressed like on the left (and the cord can be placed under it to hid it) or extended like on the depending on your trivet needs.
Till next time
Al
The basic idea behind the design was poached from some ones i found in a homewares store. Those ones were just pieces of dowel with holes drilled to hold the rope. I thought i could make a more interesting design and for much less then the $35 the store wanted for one.
And so the project begins!
Next up was to drill some holes in each end. It dawned on me that even if i punched a mark on the timber prior to drilling the holes it would be almost impossible to get holes that perfectly matched up. So a jig was made!
I cut a hardwood block in half, drilled a 25mm hole in each end, then carefully marked and drilled a 4mm hole in the top of each one. And lastly cut a slice out on the bandsaw from each bottom so the final dimension of the 25mm would be slightly less when a clamp was applied holding the dowels tightly in place.
Once that was made i was able to drill the holes at the end of each dowel precisely.
I applied a coat of tung oil to one of the test pieces and was quite happy with the result, but i felt it needed something more but i wasn't sure what. So i took 24 hours to have a think.
The next day i was doing some plastic welding and it dawned on me, i needed to blacken the groves with the soldering iron. So with all the enthusiasm in the world i set to it! And stopped once my back started to get sore, which was only 10mins after i started and i had only done 4 grooves. A quick bit of math removed any bit of remaining enthusiasm . 4 groves per rod and a total of 14 rods = 56! This was going to take a while. Luckily Mrs Paleface was kind enough to lend a hand so it went a little quicker.
After a coat of tung oil.
Its design allows for it to either be compressed like on the left (and the cord can be placed under it to hid it) or extended like on the depending on your trivet needs.
Till next time
Al
Sunday, November 9, 2014
Welding trolley follow up.
Last week i finished off building the trolley, and this morning i spent some time fitting it out.

Starting from the top.
I bolted the grinder to the top of the cabinet, its quite heavy and i was concerned the trolley would become top heavy, but luckily the welder is heavy enough to maintain good stability.
A shelf containing clamps and right angle magnets
Welding gloves, helmet and chipping hammer.
And lastly the welder on the bottom.


And lastly the right hand side with 5" grinder and accessories.
All in all i'm rather pleased how this came out. It should make for a far more efficient welding experience. The only other thing i'd like to do it change the power lead on the 4"angle grinder, it has a really short lead on it and i can't get much beyond the front of the cabinet when its plugged into the rear power board.
Till Next time.
Al
I bolted the grinder to the top of the cabinet, its quite heavy and i was concerned the trolley would become top heavy, but luckily the welder is heavy enough to maintain good stability.
A shelf containing clamps and right angle magnets
Welding gloves, helmet and chipping hammer.
And lastly the welder on the bottom.
Close up of inside shelf.
Left hand side containing 4" grinder with cutoff and grinding wheels and arbour adaptor.
On the back is a 6 way powerboard which i modified to use 15amp power power cable. I didn't want to see the effects of voltage drop over the 10m run. Also although the welder is rated to only 10amps they use 15amp cable with a 10amp plug. The power cables for the welder and bench grinder are nicely cable tied to the frame. It was when i installed the final tie i released that now i could not get to the welder wire in the welder as there is not enough room inside the cabinet to open it, and now with the power cord cable tied, i cannot move the welder out of the cabinet! Oh well. Sounds like a problem for my future self.
All in all i'm rather pleased how this came out. It should make for a far more efficient welding experience. The only other thing i'd like to do it change the power lead on the 4"angle grinder, it has a really short lead on it and i can't get much beyond the front of the cabinet when its plugged into the rear power board.
Till Next time.
Al
Subscribe to:
Posts (Atom)